转:http://jybb.me/nginx-wordpress-fastcgi_cache-purge
与其让复杂的像wordpress那样的PHP-Mysql应用去做缓存这类的额外工作,倒不如让轻量级的Nginx去缓存WordPress内容。
Nginx内置FastCgi缓存,但是不支持自动清除缓存。当你在wordpress里面新建/修改一篇文章,或者访客提交评论的时候,自动清空相关的缓存是必要的!
配置自动清空缓存的步骤很简单:
1、检查是否安装ngx_purge_cache模块
nginx -V 2>&1 | grep nginx-cache-purge -o
如果显示nginx-cache-purge即代表已安装

如果没东西输出,则需要先安装:
|
1
2
3
|
sudo add-apt-repository ppa:brianmercer/nginx
sudo apt-get update
sudo apt-get install nginx-custom
|
*注意:原文的方法仅适用于Debian/Ubuntu 用apt-get方式安装的nginx
如果你用的是lnmp.org的一键包,按以下步骤安装
|
1
2
3
4
5
6
7
8
9
10
11
12
|
mkdir /home/cache/wpcache -p
cd ~
./lnmp stop
apt-get install git -y #centos用yum install git -y
git clone https://github.com/FRiCKLE/ngx_cache_purge
wget http://soft.vpser.net/web/nginx/nginx-1.0.15.tar.gz
tar zxvf nginx-1.0.15.tar.gz
cd nginx-1.0.15/
./configure --user=www --group=www --prefix=/usr/local/nginx --with-http_stub_status_module --with-http_ssl_module --with-http_gzip_static_module --with-ipv6 --add-module=../ngx_cache_purge
make
make install
/root/lnmp start
|
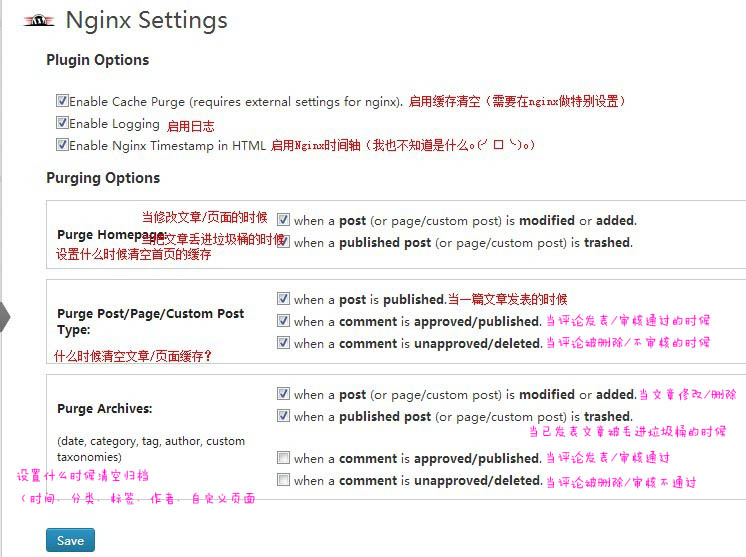
2、安装Nginx Helper插件(在wordpress后台搜索安装即可)
启用插件后,配置下插件(如下图)

3、修改nginx.conf (apt-get安装的在/etc/nginx/nginx.conf,lnmp.org的一键包在/usr/local/nginx/conf/nginx.conf,其他的自行搜索 find / -name nginx.conf)
|
1
2
3
4
5
6
|
#在http层添加以下三行代码
fastcgi_cache_path /home/cache/wpcache levels=1:2 keys_zone=wpcache:10m inactive=20m;
fastcgi_cache_key "$scheme$request_method$host$request_uri";
fastcgi_cache_use_stale error timeout invalid_header http_500;
#wpcache为名字,可以随便修改。10m为内存占用
|
4、修改位于vhost文件夹下的example.com.conf(注意要把example.com全部替换成你的域名)
|
1
2
3
4
5
6
7
8
9
10
11
12
13
14
15
16
17
18
19
20
21
22
23
24
25
26
27
28
29
30
31
32
33
34
35
36
37
38
39
40
41
42
43
44
45
46
47
48
49
50
51
52
53
54
55
56
57
58
59
60
61
62
63
64
65
|
log_format example.com '$remote_addr - $remote_user [$time_local] $request '
'$status $body_bytes_sent $http_referer '
'$http_user_agent $http_x_forwarded_for';
server {
server_name example.com www.example.com;
access_log /home/wwwlogs/example.com.access.log;
error_log /home/wwwlogs/example.com.error.log;
root /home/wwwroot/example.com;
include wordpress.conf;
index index.php;
set $no_cache 0;
# 不缓存POST操作
if ($request_method = POST) {
set $no_cache 1;
}
if ($query_string != "") {
set $no_cache 1;
}
# 不缓存后台
if ($request_uri ~* "(/wp-admin/|/xmlrpc.php|/wp-(app|cron|login|register|mail).php|wp-.*.php|/feed/|index.php|wp-comments-popup.php|wp-links-opml.php|wp-locations.php|sitemap(_index)?.xml|[a-z0-9_-]+-sitemap([0-9]+)?.xml)") {
set $no_cache 1;
}
# 已登录的不缓存(防止留言串号)
if ($http_cookie ~* "comment_author|wordpress_[a-f0-9]+|wp-postpass|wordpress_no_cache|wordpress_logged_in") {
set $no_cache 1;
}
location / {
try_files $uri $uri/ /index.php?$args;
}
location ~ .php$ {
try_files $uri /index.php;
include fastcgi_params; #Lnmp.org一键包改成include fcgi.conf;
fastcgi_pass unix:/var/run/php5-fpm.sock; #Lnmp.org一键包改成fastcgi_pass unix:/tmp/php-cgi.sock;
fastcgi_cache_bypass $no_cache;
fastcgi_no_cache $no_cache;
fastcgi_cache wpcache; #要跟前面设置的名称一样
fastcgi_cache_valid 30m; #缓存时间
}
location ~ /purge(/.*) {
allow 11.22.33.44; #此处该为你vps的ip
allow 8.8.8.8;
allow 127.0.0.1;
deny all;
fastcgi_cache_purge wpcache "$scheme$request_method$host$1";
}
location ~* ^.+\.(ogg|ogv|svg|svgz|eot|otf|woff|mp4|ttf|rss|atom|jpg|jpeg|gif|png|ico|zip|tgz|gz|rar|bz2|doc|xls|exe|ppt|tar|mid|midi|wav|bmp|rtf)$ {
access_log off; log_not_found off; expires max;
}
location = /favicon.php { access_log off; log_not_found off; }
location = /robots.txt { access_log off; log_not_found off; }
location ~ /\. { deny all; access_log off; log_not_found off; }
}
|
4、重启Nginx即可
|
1
|
/etc/init.d/nginx restart
|


