yum install java
yum install java-devel
yum install -y java-1.8.0-openjdk-devel.x86_64
logstash
./bin/logstash-plugin install logstash-input-jdbc
./bin/logstash-plugin install logstash-output-elasticsearch
http://www.ruanyifeng.com/blog/2017/08/elasticsearch.html
Elasticsearch和Head插件安装
https://www.cnblogs.com/xiaojianfeng/p/9435507.html
安装Head插件
由于head插件本质上还是一个nodejs的工程,因此需要安装node,使用npm来安装依赖的包。
<1>安装Node.js
下载解压
wget https://nodejs.org/dist/v6.10.2/node-v6.10.2-linux-x64.tar.xz
xz -d node-v6.10.2-linux-x64.tar.xz
tar xvf node-v6.10.2-linux-x64.tar
mv node-v6.10.2-linux-x64 /usr/local/node
配置并生效
vim /etc/profile
export NODE_HOME=/usr/local/node
export PATH=$PATH:$NODE_HOME/bin

source /etc/profile
查看版本验证
[elsearch@imok bin]$ node -v v6.10.2
[elsearch@imok bin]$ npm -v 3.10.10
<2>下载head插件
如果未安装git ,则先安装git工具
yum install –y git

git clone https://github.com/mobz/elasticsearch-head.git
<3>安装grunt
cd elasticsearch-head
npm install -g grunt --registry=https://registry.npm.taobao.org
<4>安装插件
npm install
在elasticsearch-head目录下node_modules/grunt下如果没有grunt二进制程序,需要执行:
npm install grunt --save
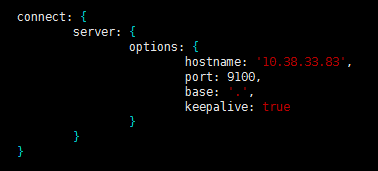
<5>修改配置 elasticsearch-head下Gruntfile.js文件
修改connect配置节点

修改 _site/app.js 修改http://localhost:9200字段到本机ES端口与IP

<6>修改 elasticsearch配置文件
修改elasticsearch.yml文件加入以下内容:
# 是否支持跨域
http.cors.enabled: true # *表示支持所有域名
http.cors.allow-origin: "*"

<7>启动head插件服务(后台运行)
/elasticsearch-head/node_modules/grunt/bin/grunt server &

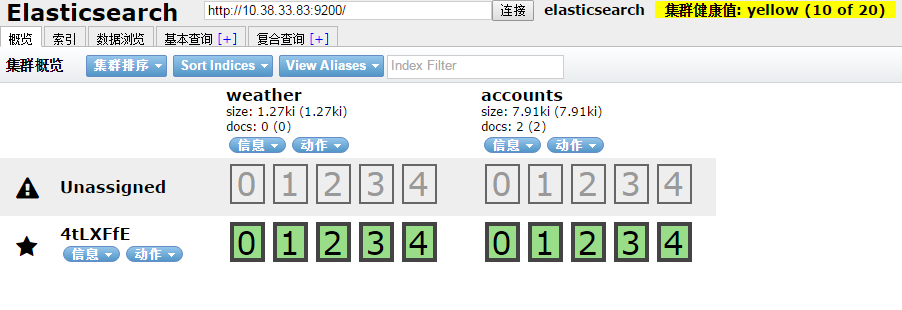
<8>查看
如下图说明安装OK

最简单详细的Elasticsearch-head插件安装
https://blog.csdn.net/qq_42875667/article/details/87450394
https://blog.csdn.net/matiascx/article/details/76419790
[1]: max file descriptors [4096] for elasticsearch process is too low, increase to at least [65536]
https://www.jianshu.com/p/692608b3b6f9
vi /etc/security/limits.conf
//在文件末尾添加下面的参数值
* soft nofile 65536
* hard nofile 131072
[2]: max virtual memory areas vm.max_map_count [65530] is too low, increase to at least [262144]
https://www.cnblogs.com/yidiandhappy/p/7714489.html
解决:
切换到root用户
执行命令:
sysctl -w vm.max_map_count=262144
查看结果:
sysctl -a|grep vm.max_map_count
显示:
vm.max_map_count = 262144
上述方法修改之后,如果重启虚拟机将失效,所以:
解决办法:
在 /etc/sysctl.conf文件最后添加一行
vm.max_map_count=262144
即可永久修改
OpenJDK 64-Bit Server VM warning: INFO: os::commit_memory(0x00000000c5330000, 986513408, 0) failed; error='Cannot allocate memory' (errno=12),又是内存不足
# 进入config目录
cd config/
# 修改 jvm.options 文件
vim jvm.options
# 修改如下数据,小编这里修改成400m
-Xms400m
-Xmx400m
https://www.cnblogs.com/gcgc/p/10297563.html
原因:
为了安全不允许使用root用户启动
解决:
es5之后的都不能使用添加启动参数或者修改配置文件等方法启动了,必须要创建用户
1、创建用户:elasticsearch
[root@iZbp1bb2egi7w0ueys548pZ bin]# adduser elasticsearch
2、创建用户密码,需要输入两次
[root@iZbp1bb2egi7w0ueys548pZ bin]# passwd elasticsearch
3、将对应的文件夹权限赋给该用户
[root@iZbp1bb2egi7w0ueys548pZ local]# chown -R elasticsearch elasticsearch-6.0.0
4、切换至elasticsearch用户
[root@iZbp1bb2egi7w0ueys548pZ etc]# su elasticsearch
5、进入启动目录启动 /usr/local/elasticsearch-6.0.0/bin 使用后台启动方式:./elasticsearch -d
[elasticsearch@vmt10003 bin]$ ./elasticsearch -d
elasticsearch安装踩过的那些坑
https://blog.csdn.net/u013641234/article/details/80792416
原因:elasticsearch新版本是不允许安装插件在文件目录plugins下面的
解决:将plugins下面的插件目录放到其他目录即可
https://blog.csdn.net/sinat_27747695/article/details/79328207
查看安装插件
http://localhost:9200/_cat/plugins
http://192.168.1.31:9200/_cluster/health
http://192.168.2.143:9200/_settings
http://192.168.2.143:9200/weblogs_index_pattern-2020.05.19/_mappings?pretty=true
$ ./elasticsearch-plugin install https://github.com/medcl/elasticsearch-analysis-pinyin/releases/download/v5.5.1/elasticsearch-analysis-pinyin-5.5.1.zip
Elasticsearch 5 Ik+pinyin分词配置详解
https://www.cnblogs.com/a-du/p/7196828.html


